AI摘要:使用Vue3和Flask搭建web应用,实现按钮点击运行脚本,反馈屏幕输出至web页面。通过API通信,实现运行脚本、获取系统状态和天气信息等功能。
Powered by AISummary.
初始想法
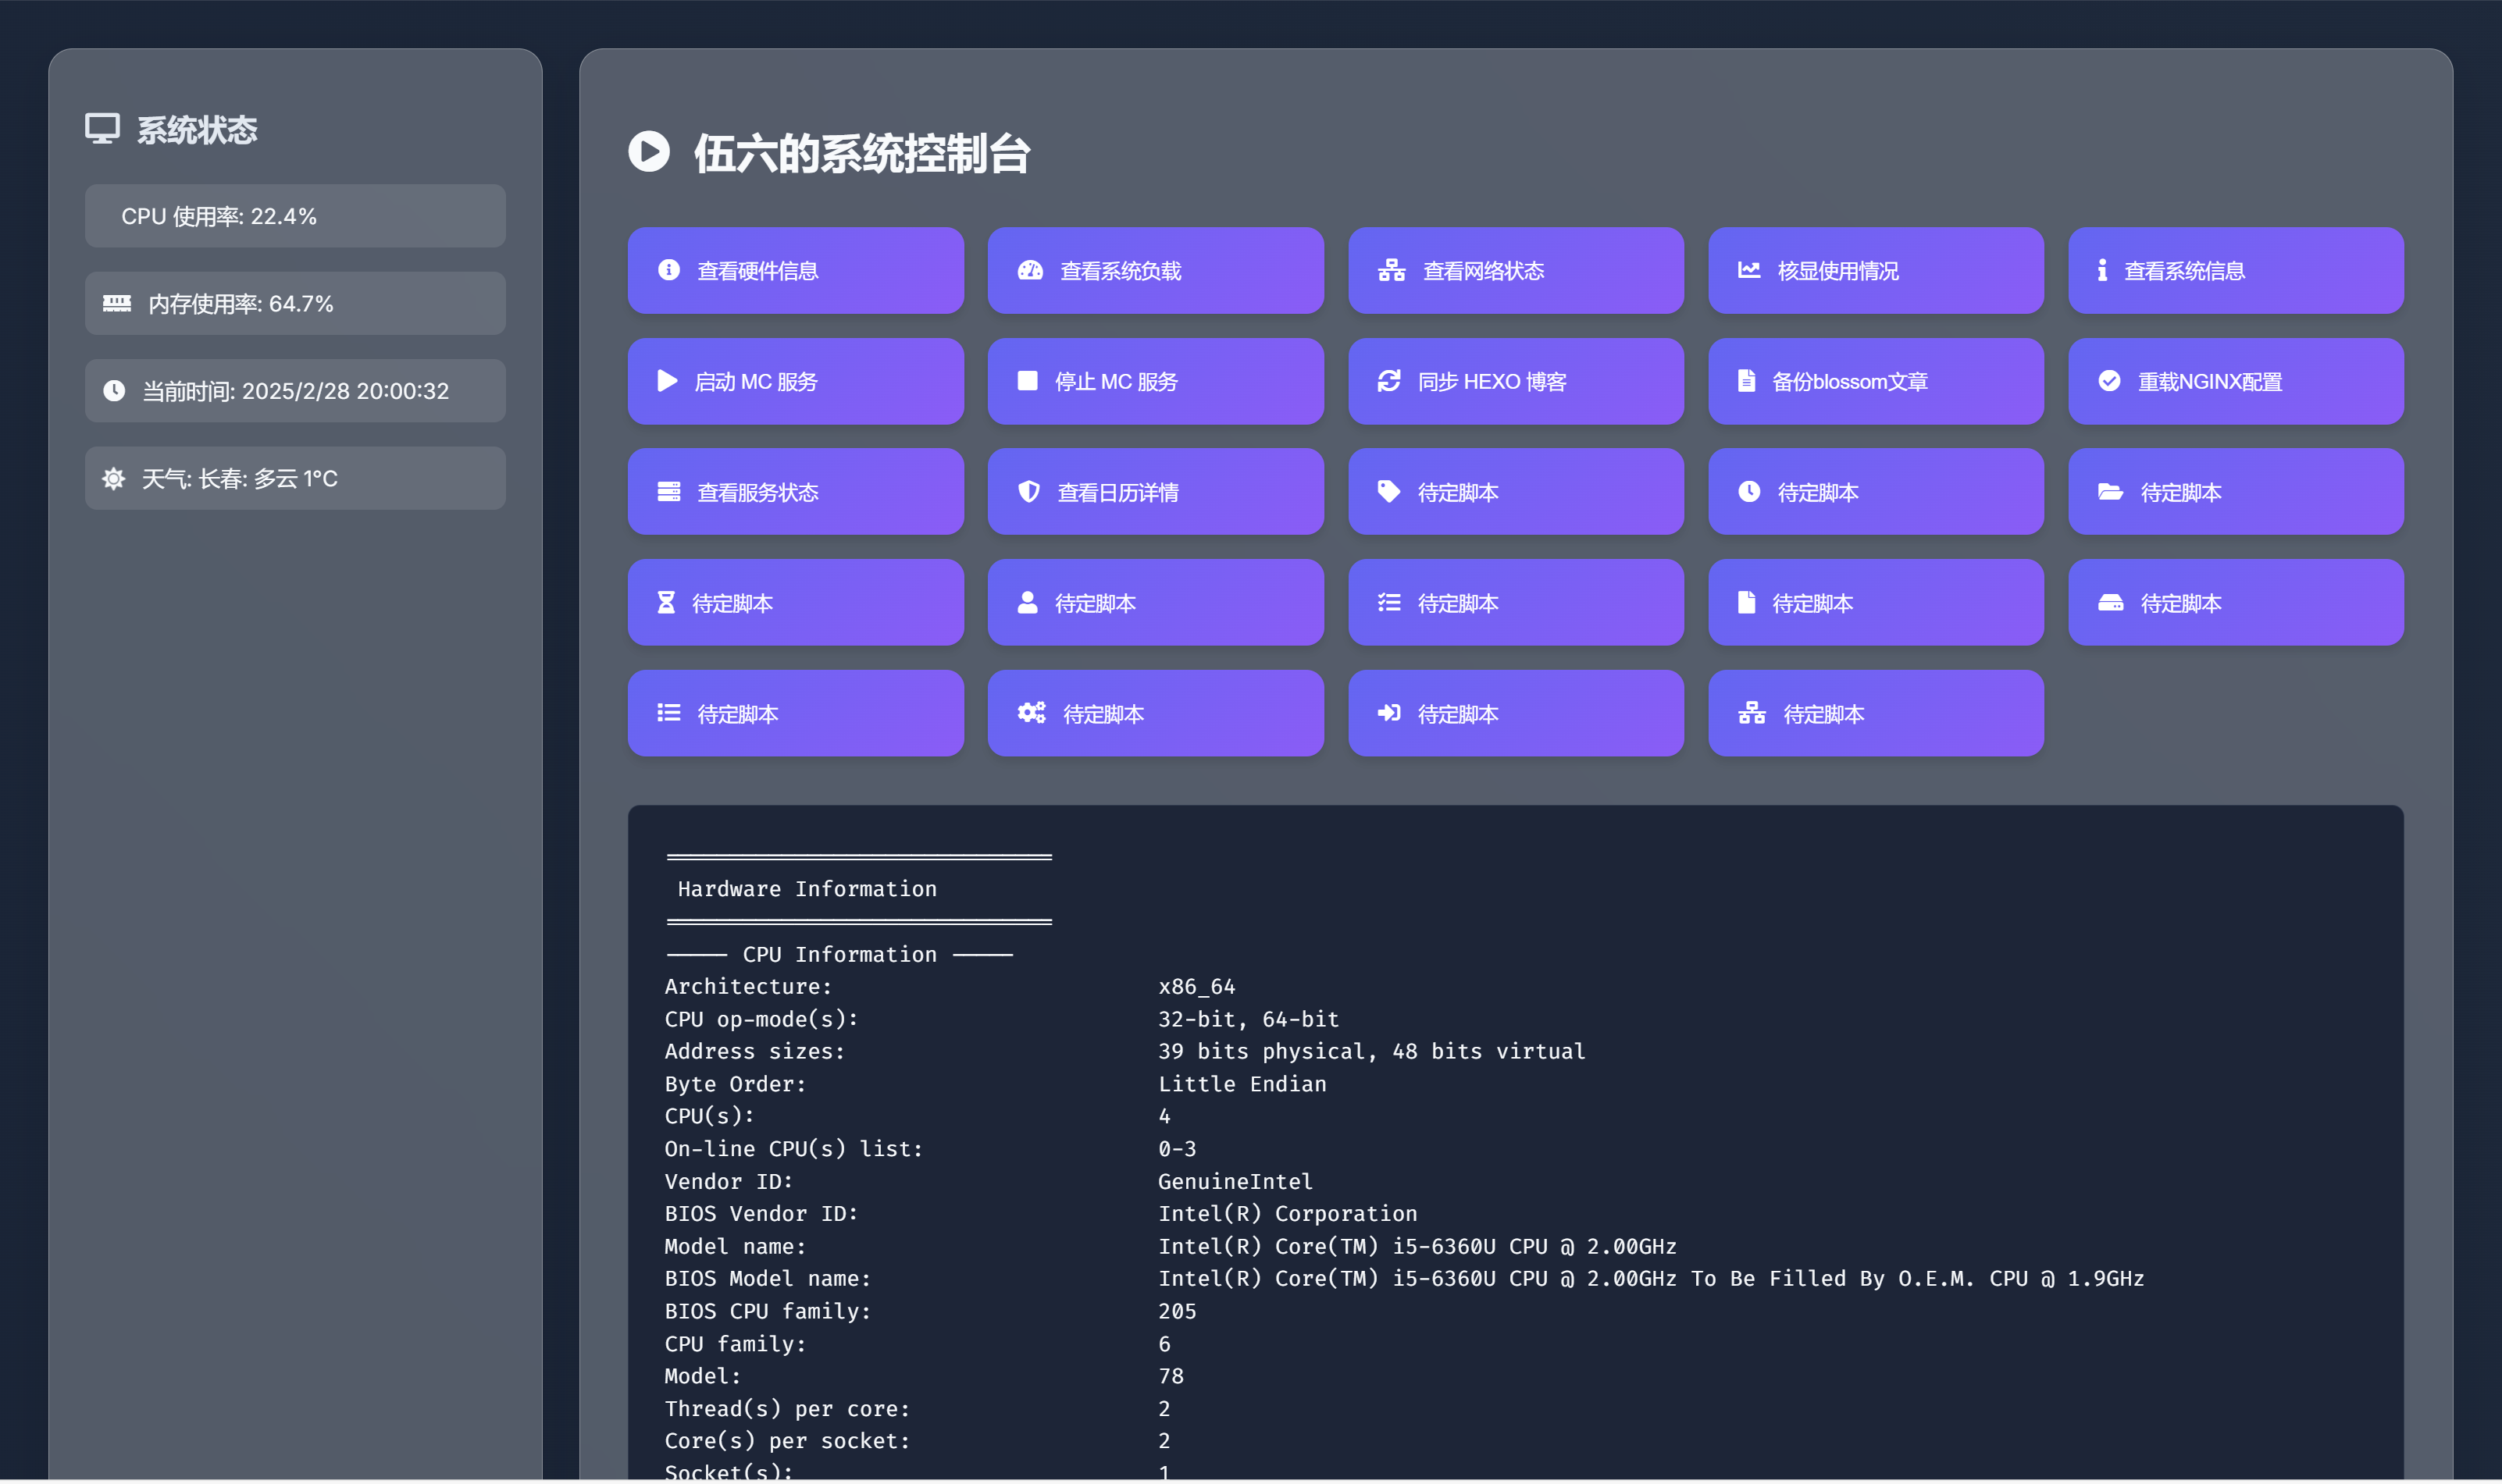
凡事从最简单的开始,我想做一个简单的web页面,页面内提供一些按钮,点击后可以运行系统内事先准备好的脚本,脚本运行后的屏幕输出要反馈回web页面,这样就不用去终端运行脚本了。
工具选择
Vue+Flask原因很简单,就是简单易用。
1. 环境准备
★Node.js(包括 npm)
★Python
★pip(Python 包管理工具)
2. 安装 Vue 3
2.1 安装 Vue CLI
在终端或命令提示符中,运行以下命令安装 Vue CLI:
npm install -g @vue/cli2.2 创建 Vue 3 项目
进入你喜欢的目录内,使用 Vue CLI 创建一个新的 Vue 3 项目。运行以下命令:
vue create frontend在创建过程中,CLI 会询问你一些选项。你可以选择手动选择功能,并选择 Babel 和 Router(可选),然后选择 Vue 3。
2.3 进入项目目录
cd frontend3. 安装 Flask
3.1 创建 Python 虚拟环境
在你的项目目录下创建一个新的目录(例如 backend)并切换到该目录:
mkdir backend
cd backend
创建一个虚拟环境(假设你使用的是 Python 3):
python3 -m venv venv3.2 激活虚拟环境
source venv/bin/activate激活后,你会看到命令行提示符的前面出现 (venv),这表示虚拟环境已激活。
3.3 安装 Flask
在虚拟环境中安装 Flask 和其他依赖:
pip install Flask flask-cors psutil3.4项目结构
确保你的项目结构如下:
your_project/
│
├── backend/               # Flask 后端
│   ├── app.py             # Flask 应用主文件
│   └── requirements.txt    # Python 依赖包
│
│
└── frontend/              # Vue 3 前端
    │
    ├── public/
    │   └──index.thml
    │
    ├── src/
    │   ├── App.vue        # Vue 应用主文件
    │   └── main.js        # 入口文件
    └── package.json
4. 创建 Flask 应用
4.1 编写 Flask 代码
注意提前准备好一些shell脚本,比如查看硬件信息的脚本,并确保这个脚本有可执行权限。
#!/bin/bash
echo "=============================="
echo " Hardware Information "
echo "=============================="
# 1. CPU 信息
echo "----- CPU Information -----"
lscpu
# 2. 内存信息
echo ""
echo "----- Memory Information -----"
free -h
# 3. 硬盘信息
echo ""
echo "----- Disk Information -----"
lsblk
# 4. 网络接口信息
echo ""
echo "----- Network Interfaces -----"
ip a
# 5. 显卡信息
echo ""
echo "----- Graphics Information -----"
lspci | grep -i vga
# 6. 主板信息
echo ""
echo "----- Motherboard Information -----"
dmidecode -t baseboard | grep -E
'Manufacturer|Product Name|Version'
# 7. BIOS 信息
echo ""
echo "----- BIOS Information -----"
dmidecode -t bios | grep -E 'Vendor|Version|Release Date'
echo "=============================="
echo " End of Report "
echo "=============================="
准备好脚本后,在 backend 目录下创建一个名为 app.py 的文件,并添加以下代码:
from flask import Flask, send_from_directory, request, jsonify, render_template_string
from flask_cors import CORS  # 导入 CORS
import subprocess
import os
import psutil  # 导入 psutil 库

app = Flask(__name__)
CORS(app)  # 在这里添加 CORS 支持


# 定义 API 路径,运行指定的脚本
@app.route('/api/run-script', methods=['GET'])
def run_script():
    # 获取请求中的脚本名称
    script_name = request.args.get('name')

    # 根据传入的脚本名称设置脚本路径
    script_paths = {
        'script1': '/patch/to/hardware_info.sh', //脚本的绝对路径
        'script2': '/patch/to/check_load.sh',
        'script3': '/patch/to/check_network.sh',
        'script4': '/patch/to/check_gpu.sh',
        'script5': '/patch/to/check_sys.sh',
        'script6': '/patch/to/start_minecraft.sh',
        'script7': '/patch/to/stop_minecraft.sh',
        'script8': '/patch/to/sync_hexo.sh',
        'script9': '/patch/to/blossom.sh',
        'script10': '/patch/to/reload_nginx.sh',
        'script11': '/patch/to/check_fuwu.sh',
        'script12': '/patch/to/check_date.sh',//我目前只弄了12个脚本
        'script13': '/patch/to/script13.sh',
        'script14': '/patch/to/script14.sh',
        'script15': '/patch/to/script15.sh',
        'script16': '/patch/to/script16.sh',
        'script17': '/patch/to/script17.sh',
        'script18': '/patch/to/script18.sh',
        'script19': '/patch/to/script19.sh',
        'script20': '/patch/to/script20.sh',
        'script21': '/patch/to/script21.sh',
        'script22': '/patch/to/script22.sh',
        'script23': '/patch/to/script23.sh',
        'script24': '/patch/to/script24.sh',
    }

    # 获取脚本路径
    script_path = script_paths.get(script_name)

    # 确保脚本存在
    if not script_path or not os.path.isfile(script_path):
        return jsonify(status='error', message=f"Script not found: {script_name}"), 404

    try:
        # 捕获标准输出和错误
        result = subprocess.run(['bash', script_path], capture_output=True, text=True, check=True)
        output = result.stdout
        return jsonify(status='success', message=output)
    except subprocess.CalledProcessError as e:
        return jsonify(status='error', message=f"An error occurred while executing the script: {e.stderr}"), 500


# 定义 API 路径,获取系统状态信息
@app.route('/api/system-status', methods=['GET'])
def system_status():
    # 获取 CPU 使用率
    cpu_usage = psutil.cpu_percent(interval=1)

    # 获取内存使用率
    memory_info = psutil.virtual_memory()
    memory_usage = memory_info.percent

    # 获取磁盘使用情况
    disk_info = psutil.disk_usage('/')
    disk_usage = disk_info.percent

    # 返回 JSON 格式的系统状态
    return jsonify({
        'cpuUsage': cpu_usage,
        'memoryUsage': memory_usage,
        'diskUsage': disk_usage
    })

if __name__ == '__main__':
    app.run(host='0.0.0.0', port=5000) //端口可以修改
4.2 创建依赖文件
在 backend 目录下创建一个 requirements.txt 文件,并添加以下内容:
plaintext
Flask
flask-cors
psutil
4.3. 运行 Flask 应用
在虚拟环境中,运行以下命令启动 Flask 应用:
python app.py此时,Flask 应用将在 http://0.0.0.0:5000 上运行。
4.4.测试api地址
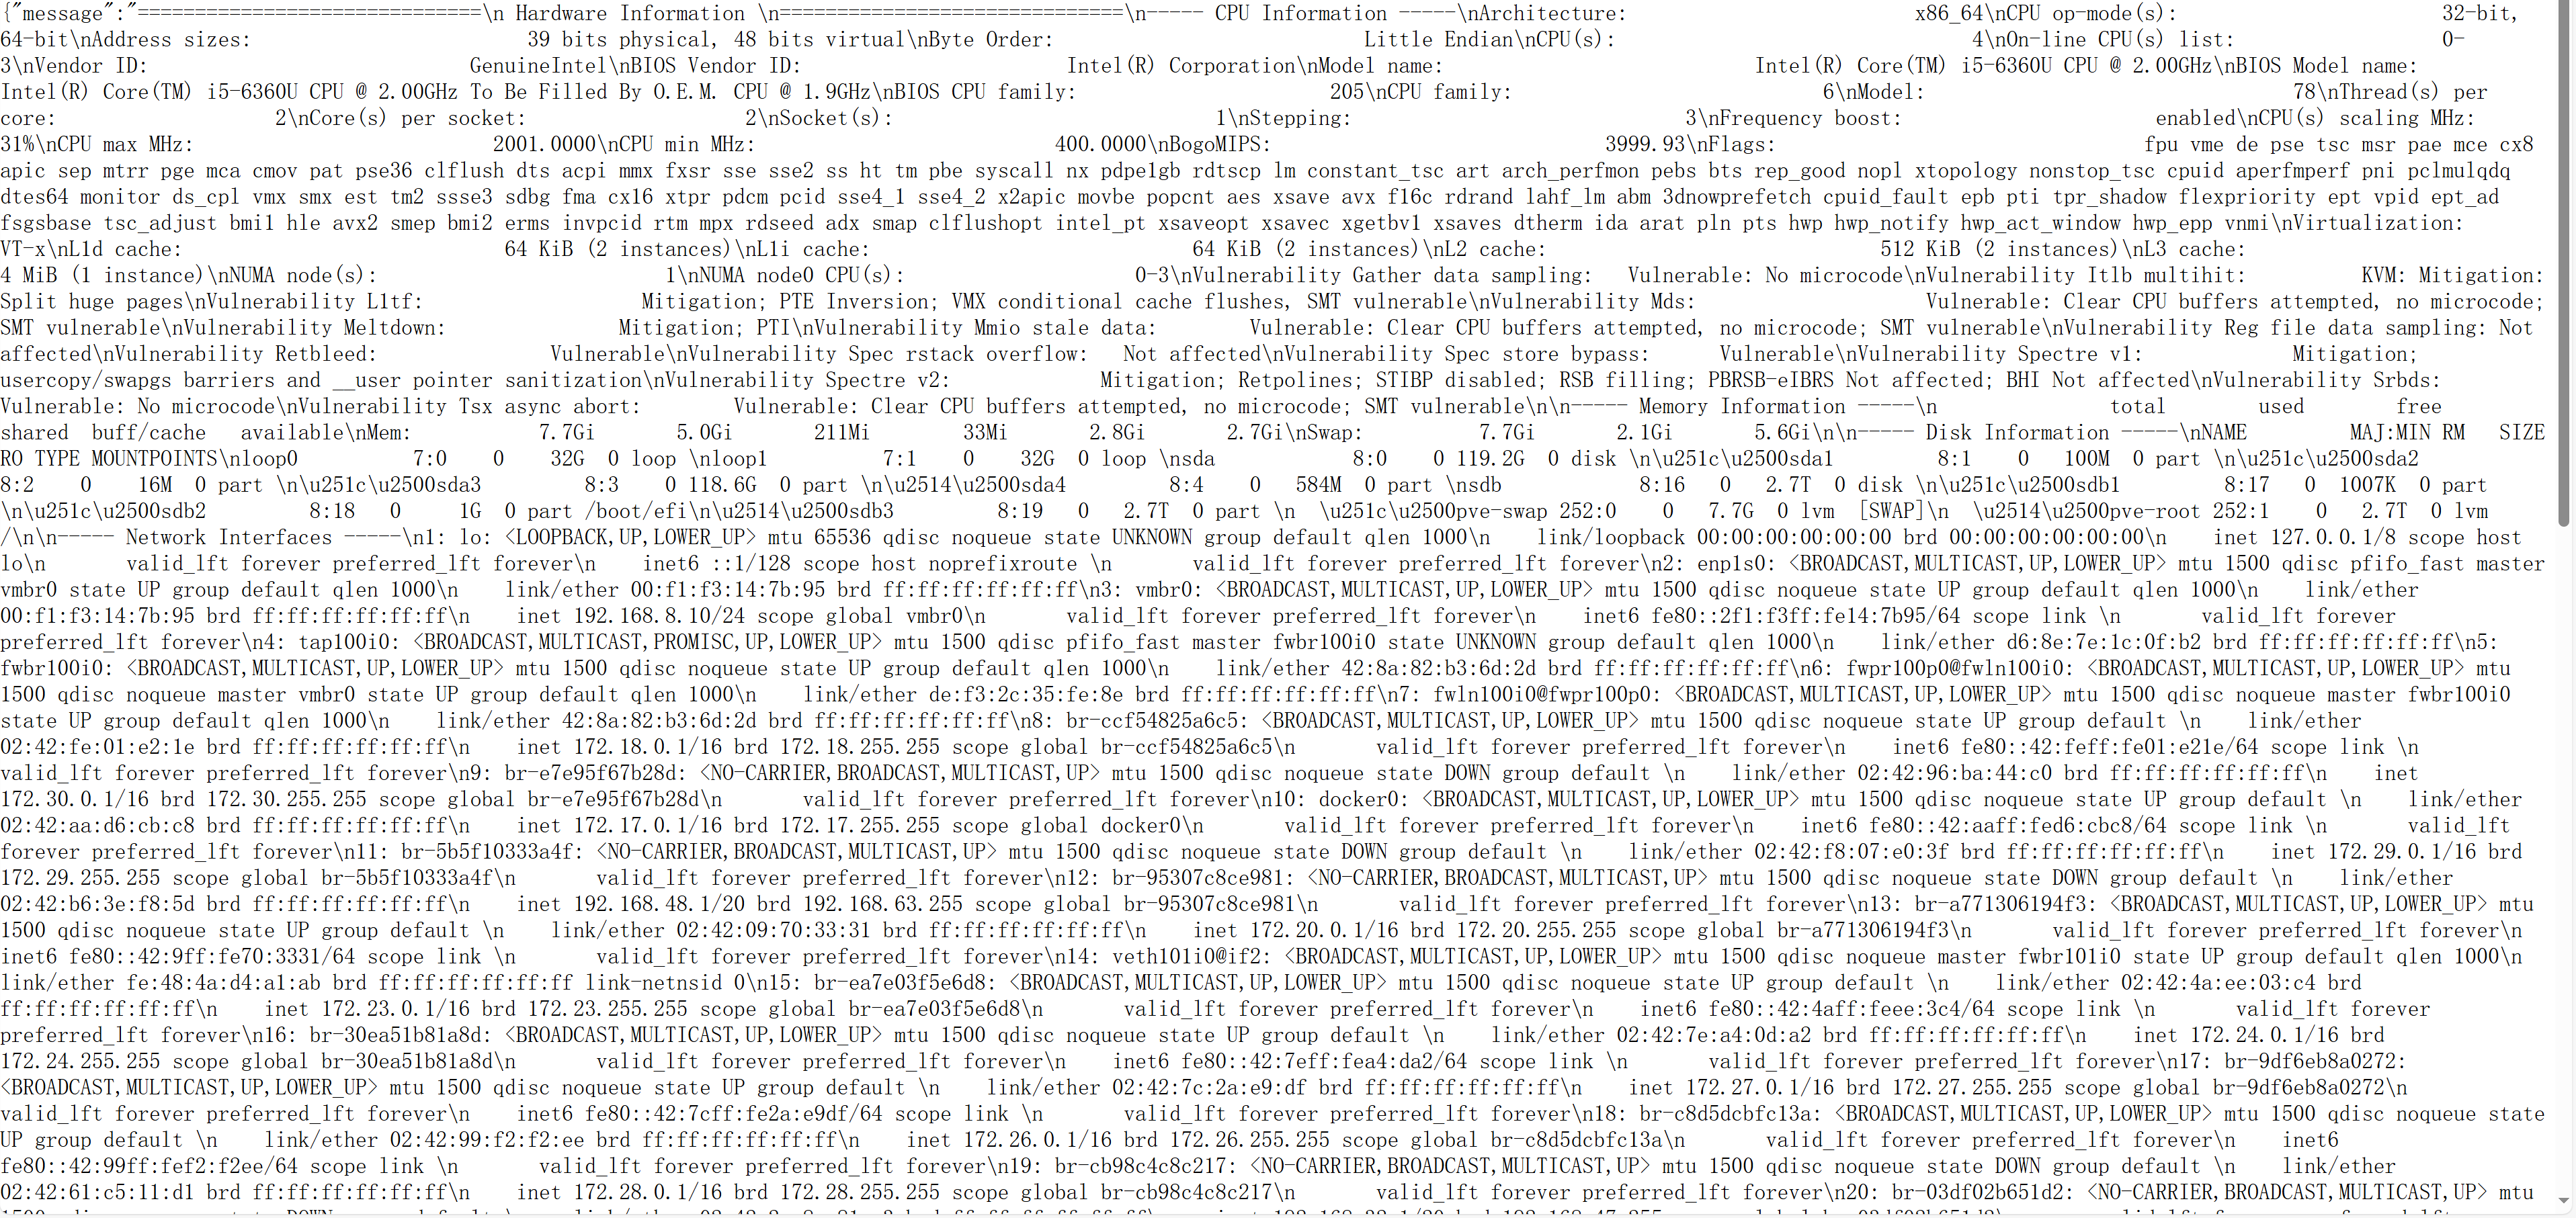
浏览器输入http://ip:5000/api/run-script?name=script1
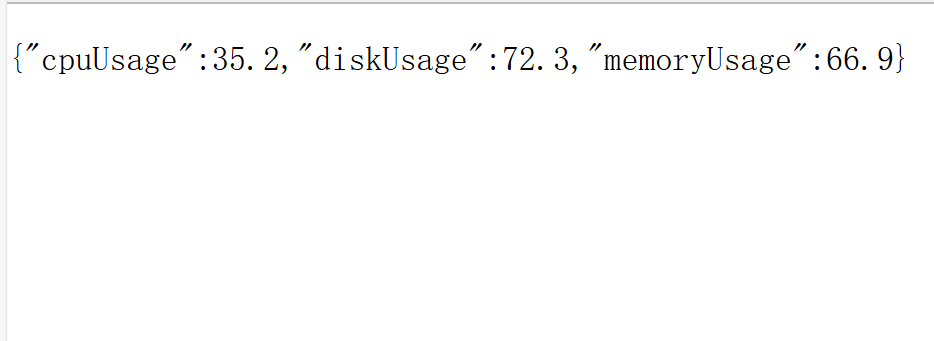
浏览器输入http://ip:5000/api/system-status
5. 编写 Vue 前端代码
5.1 进入前端项目
在另一个终端窗口(或标签)中,进入 frontend 目录:
cd frontend5.2 修改 App.vue
将以下代码放入 src/App.vue 文件中:
- 天气的部分需要自己去fetchWeather申请一个api
- 注意修改flask的api通信地址
感觉页面不美观可以自行修改
<template>
<div id="app" class="container">
  <div class="sidebar">
    <h2><i class="fas fa-desktop"></i> 系统状态</h2>
    <div class="status">
      <p><i class="fas fa-cpu"></i> CPU 使用率: {{ cpuUsage }}%</p>
      <p><i class="fas fa-memory"></i> 内存使用率: {{ memoryUsage }}%</p>
      <p><i class="fas fa-clock"></i> 当前时间: {{ currentTime }}</p>
      <p id="weather"><i class="fas fa-sun"></i> 天气: {{ weather }}</p>
    </div>
  </div>
  <div class="main">
    <h1><i class="fas fa-play-circle"></i> 我的系统控制台</h1>
    <div id="scripts" class="script-buttons"></div>
    <div id="alert" class="alert" v-if="alertMessage">{{ alertMessage }}</div>
    <div id="output" class="output" v-if="output">{{ output }}</div>
  </div>
</div>
</template>

<script>
export default {
data() {
  return {
    alertMessage: '',
    output: '',
    cpuUsage: '加载中...',
    memoryUsage: '加载中...',
    currentTime: new Date().toLocaleString(),
    weather: '加载中...'
  };
},
mounted() {
  this.generateButtons();
  this.updateTime();
  setInterval(this.updateTime, 1000);
  this.fetchWeather();
  this.fetchSystemStatus();
},
methods: {
  runScript(scriptName) {
    fetch(`http://192.168.8.10:5000/api/run-script?name=${scriptName}`) //flask的脚本api地址
      .then(response => response.json())
      .then(data => {
        if (data.status === 'success') {
          this.showAlert("脚本执行成功!");
          this.output = data.message;
        } else {
          this.showAlert(data.message);
          this.output = '';
        }
      })
      .catch(error => {
        console.error('错误:', error);
        this.showAlert('请求失败,请检查服务器');
      });
  },
  showAlert(message) {
    this.alertMessage = message;
    setTimeout(() => {
      this.alertMessage = '';
    }, 3000);
  },
  generateButtons() {
    const scriptDetails = [
      { name: "script1", text: "查看硬件信息", icon: "fas fa-info-circle" },
      { name: "script2", text: "查看系统负载", icon: "fas fa-tachometer-alt" },
      { name: "script3", text: "查看网络状态", icon: "fas fa-network-wired" },
      { name: "script4", text: "核显使用情况", icon: "fas fa-chart-line" },
      { name: "script5", text: "查看系统信息", icon: "fas fa-info" },
      { name: "script6", text: "启动 MC 服务", icon: "fas fa-play" },
      { name: "script7", text: "停止 MC 服务", icon: "fas fa-stop" },
      { name: "script8", text: "同步 HEXO 博客", icon: "fas fa-sync" },
      { name: "script9", text: "备份blossom文章", icon: "fas fa-file-alt" },
      { name: "script10", text: "重载NGINX配置", icon: "fas fa-check-circle" },
      { name: "script11", text: "查看服务状态", icon: "fas fa-server" },
      { name: "script12", text: "查看日历详情", icon: "fas fa-shield-alt" },
      { name: "script13", text: "待定脚本", icon: "fas fa-tag" },
      { name: "script14", text: "待定脚本", icon: "fas fa-clock" },
      { name: "script15", text: "待定脚本", icon: "fas fa-folder-open" },
      { name: "script16", text: "待定脚本", icon: "fas fa-hourglass-half" },
      { name: "script17", text: "待定脚本", icon: "fas fa-user" },
      { name: "script18", text: "待定脚本", icon: "fas fa-tasks" },
      { name: "script19", text: "待定脚本", icon: "fas fa-file" },
      { name: "script20", text: "待定脚本", icon: "fas fa-hdd" },
      { name: "script21", text: "待定脚本", icon: "fas fa-list" },
      { name: "script22", text: "待定脚本", icon: "fas fa-cogs" },
      { name: "script23", text: "待定脚本", icon: "fas fa-sign-in-alt" },
      { name: "script24", text: "待定脚本", icon: "fas fa-network-wired" }
    ];

    const scriptsDiv = this.$el.querySelector('#scripts');
    scriptDetails.forEach((script) => {
      const button = document.createElement('button');
      button.className = 'script-button';
      button.onclick = () => this.runScript(script.name);

      const icon = document.createElement('i');
      icon.className = script.icon;
      const text = document.createTextNode(` ${script.text}`);

      button.appendChild(icon);
      button.appendChild(text);
      scriptsDiv.appendChild(button);
    });
  },
  updateTime() {
    this.currentTime = new Date().toLocaleString();
  },
  fetchWeather() {
    const apiKey = 'xxxxxxxxxxxxxxxxxxxxxx'; //去fetchWeather注册一个api
    const city = 'Changchun'; //城市
    const url = `https://api.openweathermap.org/data/2.5/weather?q=${city}&appid=${apiKey}&lang=zh_cn&units=metric`;

    fetch(url)
      .then(response => response.json())
      .then(data => {
        if (data.cod === 200) {
          const temperature = Math.round(data.main.temp);
          const description = data.weather[0].description;
          this.weather = `长春: ${description} ${temperature}°C`; //汉字部分修改所在城市
        } else {
          this.weather = '天气信息无法获取';
        }
      })
      .catch(error => {
        console.error('获取天气时出错:', error);
        this.weather = '天气信息加载失败';
      });
  },
  fetchSystemStatus() {
    fetch('http://192.168.8.10:5000/api/system-status') //flask的系统状态api地址
      .then(response => response.json())
      .then(data => {
        this.cpuUsage = data.cpuUsage;
        this.memoryUsage = data.memoryUsage;
      })
      .catch(error => {
        console.error('获取系统状态时出错:', error);
        this.cpuUsage = '获取失败';
        this.memoryUsage = '获取失败';
      });
  }
}
}
</script>


<style>
:root {
--primary: #6366f1;
--secondary: #8b5cf6;
--glass: rgba(255, 255, 255, 0.25);
--border-light: rgba(255, 255, 255, 0.3);
}

body {
font-family: 'Inter', system-ui, -apple-system, sans-serif;
margin: 0;
padding: 0;
background: linear-gradient(45deg, #0f172a, #1e293b);
color: #f8fafc;
min-height: 100vh;
}

.container {
display: flex;
gap: 1.5rem;
padding: 2rem;
max-width: 1600px;
margin: 0 auto;
}

.sidebar {
background: var(--glass);
backdrop-filter: blur(16px);
border-radius: 16px;
padding: 1.5rem;
width: 280px;
border: 1px solid var(--border-light);
box-shadow: 0 8px 32px rgba(0, 0, 0, 0.1);
}

.sidebar h2 {
color: #e2e8f0;
font-size: 1.25rem;
margin-bottom: 1.5rem;
display: flex;
align-items: center;
gap: 0.75rem;
}

.status {
display: flex;
flex-direction: column;
gap: 1rem;
}

.status p {
display: flex;
align-items: center;
gap: 0.75rem;
padding: 0.75rem;
background: rgba(255, 255, 255, 0.1);
border-radius: 8px;
margin: 0;
font-size: 0.9rem;
}

.main {
flex: 1;
background: var(--glass);
backdrop-filter: blur(16px);
border-radius: 16px;
padding: 2rem;
border: 1px solid var(--border-light);
box-shadow: 0 8px 32px rgba(0, 0, 0, 0.1);
}

h1 {
font-size: 1.75rem;
margin-bottom: 2rem;
color: #f8fafc;
display: flex;
align-items: center;
gap: 1rem;
}

.script-buttons {
display: grid;
grid-template-columns: repeat(auto-fill, minmax(200px, 1fr));
gap: 1rem;
margin-bottom: 2rem;
}

.script-button {
background: linear-gradient(135deg, var(--primary), var(--secondary));
border: none;
color: white;
padding: 1.25rem;
border-radius: 12px;
cursor: pointer;
transition: all 0.3s cubic-bezier(0.4, 0, 0.2, 1);
display: flex;
align-items: center;
gap: 0.75rem;
font-weight: 500;
box-shadow: 0 4px 6px rgba(0, 0, 0, 0.1);
}

.script-button:hover {
transform: translateY(-2px);
box-shadow: 0 8px 12px rgba(0, 0, 0, 0.2);
background: linear-gradient(135deg, #4f46e5, #7c3aed);
}

.script-button i {
font-size: 1.1em;
}

.alert {
padding: 1rem;
border-radius: 8px;
background: rgba(74, 222, 128, 0.15);
border: 1px solid #34d399;
color: #34d399;
margin-bottom: 1rem;
animation: slideIn 0.3s ease-out;
}

.output {
background: rgba(15, 23, 42, 0.8);
border-radius: 8px;
padding: 1.5rem;
font-family: 'Fira Code', monospace;
font-size: 0.9rem;
line-height: 1.5;
white-space: pre-wrap;
overflow-x: auto;
border: 1px solid rgba(71, 85, 105, 0.5);
}

@keyframes slideIn {
from {
  opacity: 0;
  transform: translateY(-10px);
}
to {
  opacity: 1;
  transform: translateY(0);
}
}

#weather i {
animation: pulse 2s infinite;
}

@keyframes pulse {
0% { transform: scale(1); }
50% { transform: scale(1.1); }
100% { transform: scale(1); }
}

@media (max-width: 768px) {
.container {
  flex-direction: column;
  padding: 1rem;
}

.sidebar {
  width: auto;
}

.script-buttons {
  grid-template-columns: 1fr;
}
}
</style>
5.3 修改 index.html
修改public目录下的index.html文件内容
<!DOCTYPE html>
<html lang="zh-CN"> <!-- 添加语言属性 -->
<head>
  <meta charset="utf-8">
  <meta http-equiv="X-UA-Compatible" content="IE=edge">
  <meta name="viewport" content="width=device-width,initial-scale=1.0">
  <link rel="icon" href="<%= BASE_URL %>favicon.ico">
  <link rel="stylesheet" href="https://cdnjs.cloudflare.com/ajax/libs/font-awesome/5.15.4/css/all.min.css"> <!-- 添加Font Awesome链接 -->
  <link href="https://fonts.googleapis.com/css2?family=Inter:wght@400;500;600&family=Fira+Code&display=swap" rel="stylesheet">
  <title>我的系统控制台</title> <!-- 这里设置你的web标签名称 -->
</head>
<body>
  <noscript>
    <strong>We're sorry but <%= htmlWebpackPlugin.options.title %> doesn't work properly without JavaScript enabled. Please enable it to continue.</strong>
  </noscript>
  <div id="app"></div>
  <!-- built files will be auto injected -->
</body>
</html>
6. 运行 Vue 应用
在前端项目目录中,运行以下命令启动 Vue 应用:
npm run serve7. 完成!
现在你已经成功搭建了一个完整的前后端应用,前端通过 API 与 Flask 后端通信,实现了运行脚本、获取系统状态和天气信息的功能。
8. 访问应用
你可以通过浏览器访问以下地址查看运行效果:
Vue 应用: http://ip:8080
9. 注意事项及解决方案
9.1 Vue3的项目
- Vue3的项目运行后需要一直开着终端,否则项目也关闭了。
解决方法是,利用screen,
screen -S vue创建一个新的会话,如果您想分离当前的 vue 会话(使其在后台运行),可以使用以下快捷键:按下 Ctrl + A 然后按 D。
9.2 Flask的项目
- 为了避免每次都要进入虚拟环境运行,可以为这个项目配置一个服务,利用systemctl来管理。
具体步骤:
1.创建flask服务
nano /etc/systemd/system/flask.service内容如下:
[Unit]
Description=Flask Application
After=network.target

[Service]
Type=simple

WorkingDirectory=/var/www/shell_app # 你的flask的app.py目录
Environment="FLASK_APP=app.py"  # 设置 FLASK_APP 环境变量
ExecStart=/path/to/bin/python -m flask run --host=0.0.0.0 --port=5000  # 左边的路径为python虚拟环境路径,5000端口可以自定义,改完后注意更改vue3项目内的api路径
Restart=always

[Install]
WantedBy=multi-user.target
2.重载系统服务
systemctl daemon-reload3.启动flask服务并设置开机自启动
systemctl start flasksystemctl enable flask


